
Lawn
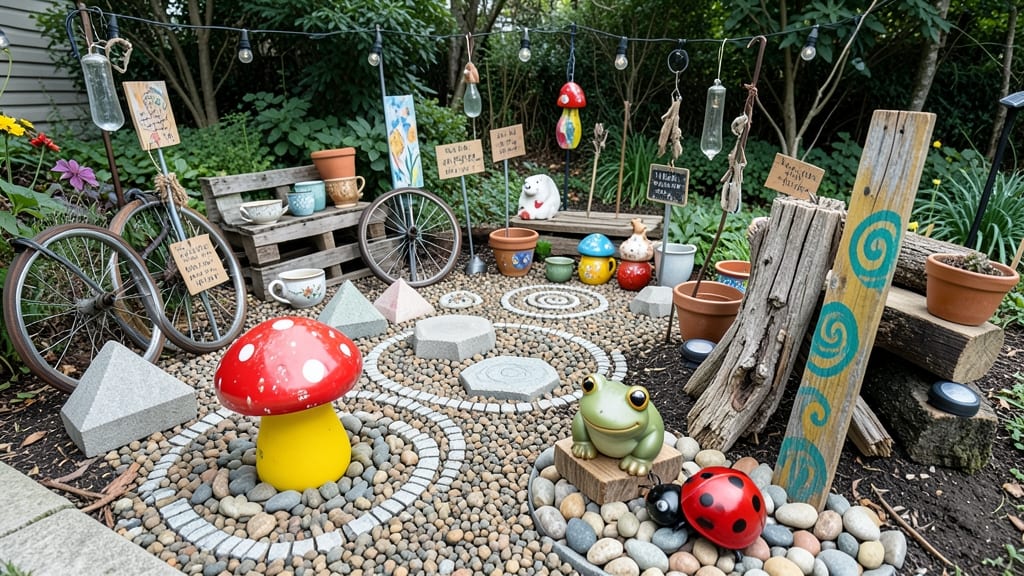
Inexpensive lawn decorations don’t have to mean sacrificing style—just creativity. 🌿 Last summer, I transformed my front yard from bland to breathtaking using thrifted finds and repurposed materials, and my neighbors kept asking where I bought everything (spoiler: nowhere fancy).
The key is mixing textures, colors, and unexpected elements to create focal points that feel intentional, not cheap.
Start with what you already have: driftwood, old pots, or even painted rocks. A single statement piece—like a weathered wooden slice propped against a tree or a stack of vintage bricks—can anchor the space.
For under $50, you can create a gallery-style arrangement that draws the eye and adds personality. The best part? These pieces require zero maintenance beyond an occasional wipe-down or repositioning for seasonal changes.
Think beyond traditional garden ornaments—incorporate everyday objects with a fresh twist. A rusted metal tray filled with moss and pebbles becomes a modern planter, while a collection of mismatched lanterns strung along a fence adds warmth.
The goal is to make your yard feel like a curated extension of your home, not a generic display. Even small touches—like a single oversized terracotta pot or a cluster of wind chimes—elevate the space instantly.
Seasonal swaps keep things fresh without extra cost. Swap out summery pastels for autumn’s warm tones using fabric scraps or painted stones, and bring in evergreens or pinecones for winter texture.
The magic happens in the arrangement: group odd numbers (three stones, five lanterns) for visual balance, and vary heights to create movement. Your yard will look like it belongs on a magazine spread—without the price tag.
📚 In This Guide
- What you need
- Instructions
- Tips and common mistakes
- Wrapping up and next steps
What you need
- ● Base Materials: Wooden pallets (2-3) – free or cheap from local businesses
- ● Concrete pavers or bricks (10-15) – $1–$3 each at hardware stores
- ● Galvanized metal pipes or reclaimed wood (5–10 ft) – for vertical accents
- ● Spray paint (various colors) – $5–$10 per can
- ● Twine, rope, or chain – for hanging or tying elements
- ● Tools: Hammer or mallet
- ○ Screwdriver or drill (optional, for stubborn screws)
- ● Safety gloves & goggles (if cutting metal/wood)
- ● Measuring tape
- ● Sandpaper (medium-grit) – to smooth rough edges
- ● Moss or artificial greenery – for a natural touch
- ● LED string lights or solar-powered lights – for evening ambiance
- ● Old ladders, wheels, or bike parts – for rustic, upcycled decor
- ● Stencils & paintbrushes – for custom designs
- ● Waterproof sealant – to protect wood from weather
Step-by-step instructions for creating budget-friendly lawn decorations
Transform your yard into a stunning outdoor space without breaking the bank—these creative techniques use everyday items to craft eye-catching garden art.
🪴 Step 1: Gather Repurposed Materials for Structure
Start by collecting items from around your home that can serve as the foundation for your decorations. Old wooden pallets, wine bottles, or even discarded metal pipes can become the backbone of your garden art. I like to sand down any rough edges on wood to prevent splinters and ensure a smooth finish—this is especially important if you're creating pieces that will be touched by kids or pets.
For a rustic look, leave the wood natural, but if you want a more polished appearance, apply outdoor-rated paint or stain. A single gallon of exterior paint covers about 150 square feet, so a small project like a pallet planter will only need a fraction of that. Let the paint dry completely before moving to the next step—this prevents smudging and ensures your decorations last through rain and sun.
☀️ Step 2: Design and Assemble Your Decorations
Sketch a simple design on paper first to visualize how your materials will come together. For example, a vertical garden can be created by stacking pallets with spaces between them for plants to grow through. Use screws or heavy-duty staples to secure pieces together—just be sure to pre-drill holes to avoid splitting wood. I always keep a few extra screws on hand because wood can shift as it dries, and you’ll want everything tightly fastened before the first rain.
For bottle decorations, like wind chimes or planters, remove labels and clean thoroughly with soapy water. Fill bottles partially with water or small pebbles to weigh them down, then add decorative elements like beads, ribbons, or painted designs. Hang them from a sturdy branch or a metal rod driven into the ground. The key here is balance—test your arrangement before securing it permanently to ensure it won’t topple in a breeze.
✂️ Step 3: Add Finishing Touches for Durability and Style
Seal your decorations with a clear outdoor sealant to protect them from moisture and UV rays. This step is critical for wood and painted surfaces, as it extends their lifespan significantly. I use a spray sealant for large pieces like pallet furniture because it covers evenly and dries quickly. For smaller items, a brush-on sealant works just as well—just apply two thin coats, allowing each to dry for at least 4 hours between applications.
Enhance your decorations with natural elements like driftwood, river rocks, or even dried flowers. These add texture and blend seamlessly with your garden. For example, a simple metal tray filled with pebbles and a few succulents becomes an instant focal point. The goal is to create pieces that feel intentional and harmonious with your outdoor space—think of them as extensions of your garden’s natural beauty rather than standalone objects.
🌿 Step 4: Install and Maintain Your Decorations
Place your decorations in high-visibility areas where they’ll enhance your lawn’s aesthetic appeal. For example, a pallet bench makes a great seating area near a fire pit, while bottle wind chimes add movement and sound to a quiet corner. Anchor larger pieces securely to the ground with stakes or weights to prevent them from shifting in wind or rain. I always check my decorations after a storm to ensure everything is still stable—this small effort saves headaches later.
Maintenance is minimal but important. Wipe down painted surfaces occasionally to remove dirt and prevent mildew. For wood, reapply sealant every 1-2 years to keep it looking fresh. If you notice any cracks or loose screws, tighten or repair them promptly. With a little care, your budget-friendly decorations will continue to wow neighbors for years to come—proving that creativity beats cost every time.
Tips & tricks for perfect budget-friendly garden art
Here's what nobody tells you about creating stunning outdoor decor without spending a fortune—these tricks make all the difference between "meh" and "wow."
Material Selection: Don't overlook overlooked items! Old bicycle wheels can become rustic planters, while broken terracotta pots can be transformed into mosaic stepping stones. I once turned a discarded ladder into a vertical herb garden—it now serves as my kitchen's main focal point. The key is seeing potential in what others discard. Look for items with natural textures like weathered wood, rusted metal, or smooth river rocks that add character instantly.
Design Tip for Stability: When working with stacked materials like pallets or bottles, always pre-drill holes and use outdoor-rated screws for assembly. I learned this the hard way after a summer storm toppled my first attempt—now I triple-check every connection. For extra security, add a dab of construction adhesive to screw joints before tightening. This small step prevents shifting and ensures your creations withstand wind and weather like pros.
Color Strategy: Use paint strategically to create focal points. A single accent color on one pallet or bottle can draw the eye, while neutral tones keep the look cohesive. I recommend starting with a base coat of white or gray—it hides imperfections and lets your chosen accent colors pop. For a cohesive look, limit your palette to three colors maximum, with one serving as your dominant hue.
Make-Ahead Strategy: Prep all materials and components in advance to avoid last-minute stress. Sand, paint, and seal everything before assembly—this ensures you're not working against the clock when it's time to install. I always complete these steps at least 48 hours before installation to allow proper drying time between coats. This approach also lets you work at your own pace without rushing through critical steps.
Pro Tips for Inexpensive Lawn Decorations
- Here's what nobody tells you about creating stunning outdoor decor without spending a fortune—these tricks make all the difference between "meh" and "wow."
- Material Selection: Don't overlook overlooked items!
- Design Tip for Stability: When working with stacked materials like pallets or bottles, always pre-drill holes and use outdoor-rated screws for assembly.
Frequently asked questions
Got questions about transforming your lawn on a budget? Here are some common ones—and their answers—to help you get started without breaking the bank!
What are the cheapest materials for DIY lawn decorations?
Look for recycled items like old tires, pallet wood, or thrifted metal signs. Nature also offers free options: smooth river rocks, driftwood, or pinecones. Check local Facebook Marketplace or Craigslist for discounted supplies—often under $10!
When is the best time to install inexpensive lawn decorations?
Spring or early fall are ideal! Avoid winter (freezing temps can damage materials) and peak summer (heat may warp wood or plastic). If using plants, follow their planting season—but decorative rocks or metal pieces can go in anytime the ground isn’t frozen.
Can I repurpose old items into lawn decor?
Old ladders make rustic trellises, broken dishes become mosaic stepping stones, and wine bottles transform into solar-powered lanterns. Just clean, sand, or paint them first. Pro tip: Seal wood with outdoor varnish to prevent rot!
How do I keep decorations from getting damaged or stolen?
Secure lightweight items with concrete blocks or stakes. For metal/wood, add weatherproof coatings. Place valuables near your home or in plain sight. If theft is a concern, opt for heavy or oddly shaped pieces (like stacked tires) that are harder to carry off.
What’s a quick fix if my DIY decoration looks messy?
Give it a fresh coat of paint or stain for a polished look. For rustic charm, embrace the patina—just scrub off loose flakes first. Mismatched colors? Use them as a theme (e.g., "vintage garden") or paint everything a single neutral tone for cohesion.
Bonus Tip:
Start small! Test a few decorations in a corner of your yard before committing. Before/after photos can also help track progress—your future self (and neighbors!) will thank you.
Wrapping up and next steps
Transforming your lawn into a stunning outdoor space doesn’t have to break the bank! With a little creativity and the right materials, you can create inexpensive lawn decorations that add charm and personality—without the hefty price tag.
Whether you’re repurposing everyday items or crafting DIY pieces, the key is to have fun and let your unique style shine.
Ready to take the next step? Grab your tools, gather inspiration, and start designing! Your neighbors will be green with envy—in the best way. 🌿✨