
Lawn
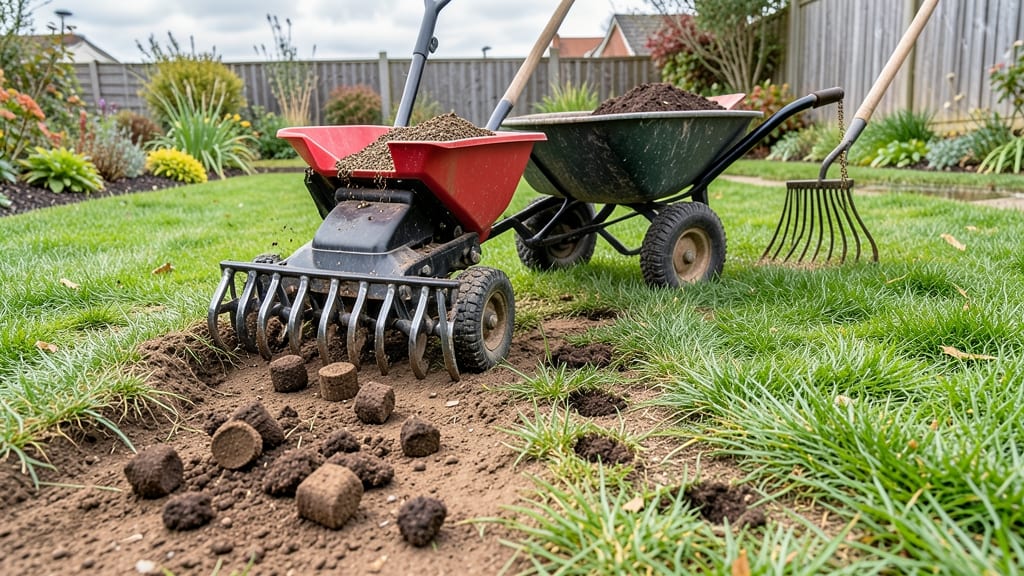
Aerating your lawn before and after overseeding or fertilizing is the secret weapon behind that shockingly lush carpet of grass. 🌱 I’ve seen lawns go from patchy and tired to vibrant green in just a few weeks after proper aeration—it’s like giving your grass roots a deep breath of fresh air.
The key is timing: aerate in early fall or spring when the soil is moist but not soggy, and you’ll see roots spread deeper, faster.
You’ll need a core aerator (rent one if you don’t own), a rake, and maybe a lawn roller for flattening after. The process takes about 2-3 hours for a typical yard, and the best part?
You skip the guesswork about soil compaction. After aerating, seeds or fertilizer can finally reach the roots where they belong, not just sit on top like they’re playing hide-and-seek.
By the end of the season, you’ll notice thicker blades, fewer bare spots, and grass that bounces back from foot traffic like it’s never been stressed. The roots grow stronger, drought resistance improves, and weeds struggle to take hold.
It’s the one lawn care task that actually pays off in visible results—no shortcuts needed.
Here’s the thing—most people aerate once and expect miracles, but the real magic happens when you make it a twice-a-year habit (fall and spring). That’s how you build a lawn that stays green even when neighbors are still patching brown spots. Let’s get those roots breathing!
📚 In This Guide
- What you need
- Instructions
- Tips and common mistakes
- Wrapping up and next steps
What you need
- ● Aerator: Manual spike aerator (budget-friendly, best for small lawns under 500 sq. ft.)
- ● Core/aeration machine (rental recommended for lawns 500+ sq. ft.; 4-6" tines, 3-4" spacing between holes)
- ● Lawn mower (set to high for a 1.5–2" cut before aerating)
- ● Rake or dethatcher (bendable metal tines, 8–12" width)
- ● Garden hose with nozzle (for pre- and post-aeration watering)
- ○ Fertilizer (optional but recommended): Slow-release high-nitrogen fertilizer (e.g., 20-5-10 ratio)
- ● Organic options like compost or bone meal (for eco-friendly lawns)
- ○ Overseeding mix (optional): High-quality cool-season grass seed (e.g., Kentucky bluegrass, fescue)
- ● Seed spreader (broadcast or drop-type, calibrated for your seed type)
- ● Weather check: Aerate when soil is moist but not soggy (ideal: 4–6" deep dampness). Avoid aerating during drought or heavy rain.
- ● Lawn health: Remove debris, toys, or obstacles from the yard. Mow 24–48 hours before aerating.
- ● Time of year: Cool-season grasses: Aerate in early fall (Sept–Oct) or spring (March–April).
- ● Warm-season grasses: Aerate in late spring (May–June) or early fall (Aug–Sept).
- ○ Optional add-ons: Soil test kit (to check pH and nutrient levels before fertilizing)
- ● Lawn roller (lightweight, for firming seed-to-soil contact post-seeding)
Step-by-step guide to aerating your lawn for healthier grass
Here's the straightforward method I use to transform compacted lawns into lush, root-strong carpets.
🪴 Step 1: Choose the Right Time and Tools
Spring and fall are your best windows for aeration—when soil is moist but not soggy. I always do it after a good rain or watering session, when the top 6 inches of soil feels damp but not dripping. For a 4,000 sq ft lawn, rent a core aerator (the kind that pulls out soil plugs) rather than spike aerators—those just poke holes without relieving compaction.
Wear sturdy shoes and dress for the weather. The machine vibrates and kicks up soil, so I grab gloves and a dust mask to avoid breathing in particles. Clear any debris first—rocks, sticks, or toys can damage the aerator blades. If your lawn has thick thatch (over ½ inch), mow it short first to help the machine penetrate deeper.
⏰ Step 2: Prepare the Lawn and Run the Aerator
Mow the lawn to a height of 2-3 inches before aerating—this prevents the machine from scalping the grass. Walk the entire area to check for low spots or uneven terrain. If you see puddles forming after rain, those areas need extra attention. Set your aerator to the deepest setting possible (usually 3-4 inches) for best results.
Run the aerator in straight, overlapping passes—like mowing, but perpendicular to your last pass. You'll see ¼-inch diameter soil plugs left behind; these are good! They improve drainage and let air, water, and nutrients reach the roots. For large lawns, work in sections to avoid fatigue. I like to mark progress with a hose—watering the edges of each section keeps the grass from drying out while I finish.
💧 Step 3: Water and Apply Top Dressing (Optional)
Water the lawn deeply right after aerating—this helps the soil plugs settle and encourages root growth. Aim for 1 inch of water over 24 hours. If you notice plugs sticking up after 48 hours, gently press them back into the soil with your foot or a lawn roller. This prevents tripping hazards and helps them break down faster.
For extra benefits, spread a ¼-inch layer of compost or topsoil over the entire area using a broadcast spreader. This fills voids left by the aerator and adds organic matter. Lightly rake it in so it blends with the soil plugs. Skip this step if your soil is already rich—overdoing it can smother grass. Water again lightly to help the top dressing settle.
☀️ Step 4: Maintain and Monitor Recovery
Keep the lawn well-watered for the next 2-3 weeks—this helps roots establish in the newly aerated soil. Avoid heavy foot traffic until the soil plugs break down (usually 7-10 days). You'll see new grass growth in 2-4 weeks if done correctly. If brown patches appear, it’s often from overwatering or compaction in untreated areas—adjust your watering to 1 inch per week total.
Follow up with fertilizer (low-nitrogen, high-potassium) in 4-6 weeks to strengthen roots. I like to overseed bare spots at this time too—just rake lightly to expose fresh soil. Aerate again next season to maintain results. The key is consistency: healthy lawns need this treatment once a year at minimum, twice if you have heavy foot traffic or clay soil.
Tips & tricks for perfect lawn aeration
Took me years to figure out these game-changers that make all the difference between a half-hearted aeration and a lawn transformation.
Timing is Everything: The 24-hour watering window after aeration is your best friend. I've learned the hard way—if you water immediately, the soil plugs won't settle properly. Wait until the next morning for that 1-inch watering to work magic. For clay-heavy lawns, split that 24-hour watering into two 12-hour sessions to prevent runoff.
Soil Plug Strategy: Those ¼-inch soil plugs are your secret weapon! Don't just leave them—gently press them back into the soil after 48 hours using a lawn roller. I've seen lawns where people ignored them for weeks, and they became tripping hazards. Pressing them in also helps them break down faster, letting roots access those nutrients sooner.
Section Workflow: Working in sections isn't just about avoiding fatigue—it's about maintaining moisture. I mark progress with a hose by watering the edges of each completed section. This keeps the grass from drying out while you finish. For large lawns, I even set up a sprinkler on a timer for the areas I've already aerated to maintain that critical moisture balance.
Thatch Thickness Check: If your thatch layer is over ½ inch thick, mow it short before aerating—this prevents the machine from bouncing off the surface. I use a slit mower set to 1 inch for thick thatch areas, then aerate immediately after. This two-step process creates the perfect conditions for deep penetration.
Pro Tips for Aerate Lawn Before And After
- Took me years to figure out these game-changers that make all the difference between a half-hearted aeration and a lawn transformation.
- Timing is Everything: The 24-hour watering window after aeration is your best friend.
- Soil Plug Strategy: Those ¼-inch soil plugs are your secret weapon!
Frequently asked questions
Got questions about aerating your lawn?
You’re not alone! Here are some of the most common queries—and straightforward answers—to help you get it right.
How do I know if my lawn needs aeration?
If your grass feels spongy underfoot, has thatch buildup over ½ inch thick, or shows signs of compaction (like puddles or slow water absorption), it’s time to aerate. Pro tip: Walk across your lawn—if your shoes sink, compacted soil is likely the culprit!
When is the best time to aerate my lawn?
For cool-season grasses (like Kentucky bluegrass or fescue), aim for early fall or spring. Warm-season grasses (like Bermuda or Zoysia) thrive with aeration in late spring or early summer. Timing tip: Avoid aerating during droughts or extreme heat—soil should be moist but not soggy.
Can I aerate my lawn myself, or should I hire a pro?
DIY aeration is totally doable with a manual or rental core aerator! For small lawns, renting a machine for a weekend is budget-friendly. Larger yards or heavily compacted soil might warrant a pro—especially if you’re tackling slopes or thick thatch. Budget hack: Split the job into sections to save time and effort.
What should I do with my lawn right after aerating?
After aerating, lightly rake the soil plugs to break them up, then water deeply to help them settle. Avoid heavy foot traffic for 2–3 days, and consider overseeding or fertilizing within 1–2 weeks for best results. Post-aeration pro tip: Keep soil moist (like a damp sponge) to encourage root growth!
Why does my lawn look worse after aeration?
Don’t panic! Aeration creates temporary “swiss cheese” holes, but this boosts root health. Within 2–4 weeks, grass should fill in, and soil will firm up. If you see excessive bare spots, overseed immediately. Patience pays off: Think of it as a spa day for your lawn’s roots!
Wrapping up and next steps
Aerating your lawn is a game-changer for healthier, thicker grass—and the before-and-after results speak for themselves! 🌱 By improving soil aeration, you’re giving your roots the space to breathe, absorb nutrients, and thrive. The effort pays off in lush, vibrant growth, making your yard the envy of the neighborhood.
Ready to transform your lawn? Start small—pick a sunny weekend, gather your tools, and take that first step toward a greener future. Your grass (and future barbecues) will thank you!